

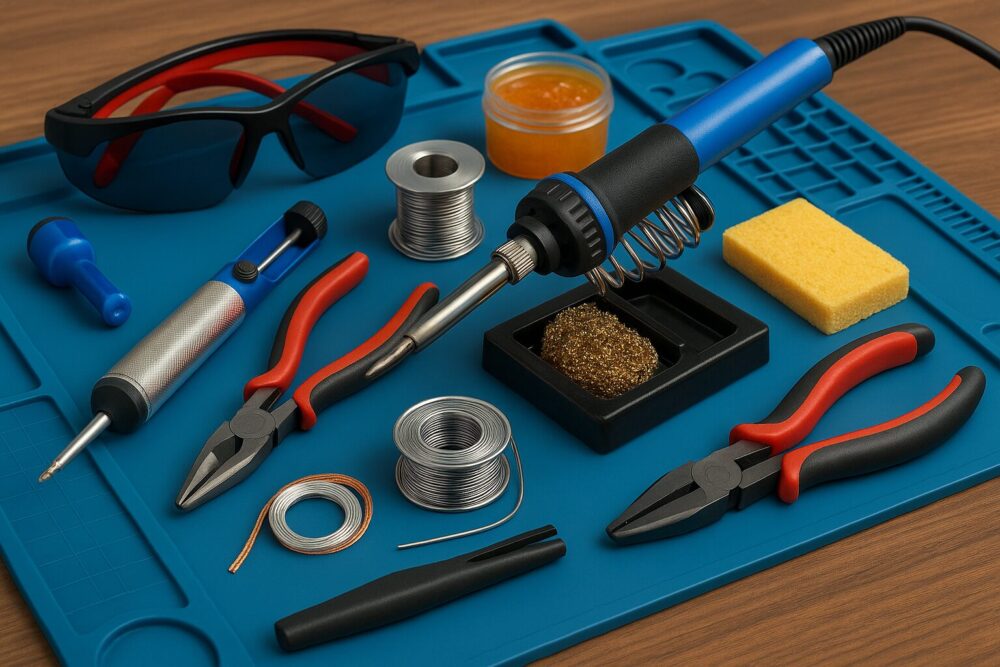
🛠 What You’ll Need
- Soldering iron or soldering station (ideally with adjustable temperature)
- Solder (rosin-core, lead-free if possible)
- Flux (if your solder isn’t flux-cored or if you need extra)
- Wire strippers / cutters
- Helping hands, clamps, or a vise to hold parts steady
- Sponge, brass wool, or tip cleaner
- Safety glasses and good ventilation (fume extraction or open window)
- Desoldering braid or pump (for mistakes)
- Heat shrink tubing or insulation (for finishing)
⚡ Choosing the Right Soldering Iron Wattage
Not all soldering irons are the same. The correct wattage makes your work easier and your joints stronger:
- Low Wattage (15–25W)
Best for delicate electronics and fine circuit board work. Heats up slowly and loses heat quickly if used on larger joints. - Medium Wattage (30–50W)
Good all-round choice for hobbyists. Handles most PCB work, connectors, and wires. Heats quickly enough to maintain flow without overheating components. - High Wattage (60–100W)
Suited for heavier jobs: thick wires, large connectors, or metalwork. Risk of overheating pads and components, so not ideal for small electronics.
👉 Tip: Temperature-controlled soldering stations (usually 30–60W) give flexibility. You can lower the heat for sensitive jobs and raise it for larger joints.
Quick Reference Table: Wattage
| Wattage Range | Best For | Avoid Using On |
|---|---|---|
| 15–25W | Fine PCBs, small components | Thick wires, heavy connectors |
| 30–50W | Everyday electronics, connectors, hobby use | Very large joints |
| 60–100W | Large wires, heavy connectors, metalwork | Sensitive boards and micro-components |
🧵 Choosing the Right Solder Diameter
Just like wattage, the thickness of the solder wire makes a big difference:
- Thin Solder (0.5–0.7 mm)
Best for fine electronics, circuit boards, and small connectors. Allows precision with small pads and avoids flooding the joint. - Medium Solder (0.8–1.0 mm)
A versatile, general-purpose size for hobbyists. Works for most wiring, connectors, and everyday jobs. - Thick Solder (1.2 mm and above)
Suited for heavy-duty joints like large wires, connectors, or mechanical repairs. Flows a lot of solder quickly, so not ideal for delicate work.
👉 Tip: Many makers keep two spools handy — thin for PCB work, thicker for wires. Switching as needed saves frustration.
Quick Reference Table: Diameter
| Diameter | Best For | Avoid Using On |
|---|---|---|
| 0.5–0.7 mm | PCBs, small pads, fine electronics | Large joints, thick wires |
| 0.8–1.0 mm | Everyday wiring, connectors, general use | Ultra-fine SMD pads |
| 1.2 mm+ | Large wires, heavy-duty soldering | Precision electronics |
🔥 Prepping Your Workspace
- Clear your work area of clutter and flammables.
- Place your soldering iron in a stable stand.
- Use a fume extractor or fan to keep fumes away from your face.
- Turn on the iron and let it reach operating temperature (~350–400 °C for lead-free solder).
🧼 Clean & Tin the Tip
- Clean your soldering tip with a damp sponge or brass wool to remove oxidation.
- “Tin” the tip by applying a small amount of solder — this improves heat transfer.
- Re-clean and re-tin periodically as you work.
✂️ Prepare the Parts & Surfaces
- Strip insulation from wire ends. Twist strands tightly.
- Clean dirty or oxidised PCB pads with isopropyl alcohol.
- Apply flux if needed to help solder flow.
🔗 Making the Solder Joint
- Secure the parts so they don’t move.
- Heat the joint (not just the iron touching solder) so both pieces reach soldering temperature.
- Feed solder into the joint, not directly onto the iron.
- Remove solder first, then the iron. Hold still until cooled.
- Inspect: a good joint is shiny, smooth, and well-covered.
⚠️ Avoid cold joints: dull, grainy, weak connections happen when the joint isn’t hot enough.
❌ Understanding Dry Joints
One of the most common problems for beginners is the dry joint (also called a cold joint).
How to Spot a Dry Joint
- Dull, grainy, or cracked appearance instead of shiny and smooth.
- Solder looks like a blob sitting on top rather than flowing into the connection.
- The joint may feel loose or break under slight pressure.
Why Dry Joints Happen
- The joint wasn’t heated enough before applying solder.
- Movement while the solder was cooling.
- Dirty, oxidised, or contaminated surfaces.
- Using too little heat or the wrong diameter solder.
How to Fix Dry Joints
- Reheat the joint until both parts are hot.
- Apply a little fresh solder (with flux) and let it flow properly.
- Hold the joint steady until it cools and solidifies.
👉 Tip: If you find a dry joint, always fix it. Leaving it in place can lead to intermittent faults or total failure.
🔍 Inspect, Clean & Protect
- Check joints are shiny and properly bonded.
- Remove excess solder with wick or pump if needed.
- Clean off flux residue with isopropyl alcohol.
- Protect with heat shrink tubing or tape.
⚠️ Safety & Troubleshooting Tips
- Always keep the iron in its stand when not in use.
- Use ventilation — solder and flux fumes can be harmful.
- If solder won’t flow, check the joint temperature, tip cleanliness, and flux use.
- Practice on scrap before attempting critical work.
- Don’t be afraid to desolder and retry — better than leaving a weak joint.
🧪 Practice Makes Perfect
Soldering is a hands-on skill. The more you practice, the better your joints will look and perform. Start small, work up to more complex boards, and don’t forget to enjoy the process.